
Get Started Quick Guide
1. How to setup Provider ID?
Some payers need their secondary ID to be passed along with the claims, for e.g. Medicare, Blue Cross/Blue Shield etc. The Provider Id is set up from the Provider Insurance page.
1. Click on the Master Setup module and choose Provider, the Provider List with the details of the Providers will be displayed.

- From Provider list click on the Setup Insurance
 icon next to the provider. This will bring up the list of Insurance companies, if no insurance has been added for the provider, this list will be empty.
 - If no Insurance has been added for this provider, click the add
 button to add new insurance; else click the Edit button next to the Insurance company from the list.
 - When the Insurance Accepted by Provider screen appears, click on the search
 button and select the Insurance Company.
 - Enter the PIN, Group Id number of the provider in the relevant boxes.

1. Click in the Secondary ID Type box and select the Secondary ID Type. Usually for Medicare and Blue Cross/Blue Shield plans this field has to be set as Medicare and Blue Cross/Blue Shield respectively.

Provide the corresponding secondary ID.
Click the Save button after entering all the required details.
2. How can we add a service location?
- Click on the “Advance Setup” button
- Click on the “Service Location” button
- To add a new location click on the “+” button
- Fill in all the required information on the “Service Location” window
- Click on the Save button
3. How can we add a new Patient on an account?
- Click on the “Patients Button”
- Now on the “Patient Search” page click on the “Add Button”.
- On the “Patient Information” window fill in all the required data. “Please note all fields marked with a red star should compulsorily be filled.”
- Click on the Save Button.
4. How can we Add Insurance for an existing patient?
- Click on the “Patients” button
- On the “Patient Search” window you can search for a patient using “Firstname, LastName, DOB etc.”
- Select the desired patient from the list that appears.
- Now on the new window under the “Insurance Information” section click on the + button.
- Fill in all the required information on the new window that appears and then click on the “Save” button.
- The insurance information would be added to the patient detail window.
5. How to make an appointment for a patient?
- Click on the “Scheduler” button
- On the “View Appointment Schedule” page, do you see a Calendar? Select the desired date on which you want to give an appointment to the desired patient.
- Now on the right hand side of your screen double click on the white area under a provider name.
- Patient Information window will open, fill in all the required data
- Click on the Save button.
6. How to do charge entry for Superbills received?
- Click on “Billing”
- Click on the “Charge Entry” button from the list
- On the “Charge Entry Screen” under “Legal Entity drop-down” select “ALL”.
- Change the “Appointment Date” to the desired date and then click on the search button.
- Select the desired patient from the list.
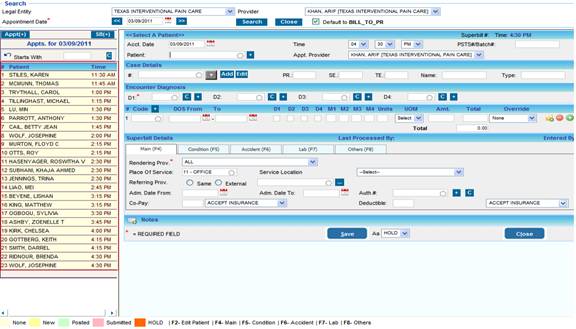
- Under the Case Details box type in the case number. If you do not have the case information; you need to click on the “ADD” button next to the Case Details box. You will receive the “Insufficient patient information” window on your screen.
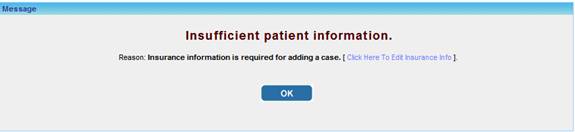
- Click on the “Click here to edit Insurance Info”
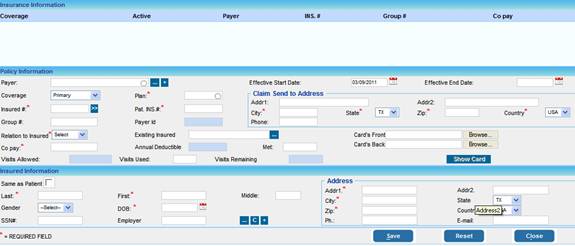
- On the Insurance Information window select the correct “Payer info”, fill in all the mandatory fields and then click on “Save”. This will generate a case number for the patient.
1. Under the Encounter Diagnosis box fill in all the diagnosis marked in the Superbill. Fill in the CPT Codes in the CPT Codes box.
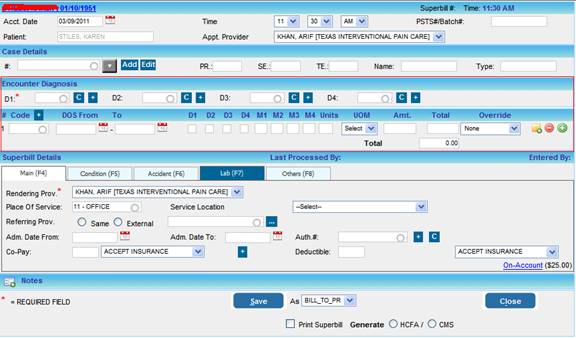
- Select the correct rendering provider, Place of service.
- Under the Service Location drop-down select the first option from the list.
- Under the Referring Prov option choose the correct option; “Same or External”
- If the Referring Prov is an External; Type in the correct name in the box provided. Make sure the NPI number is available for the Referring Provider.
- Under the Co-pay put in the correct amount mentioned in the superbill, select the “Not Applicable” option from the drop down.
- Select the “Not Applicable” option from the drop down next to “Deductible”.
- After entering all the necessary information, choose the appropriate option from the list i.e. NEW, BILL To PR, or HOLD and then click the Save button.
How to Generate and send/print claims? (the same can be done for UB04 Claims)
- On Left side of list pane click Charges then click on Submit Claims.
- Then you will see the first Tab highlighted in green that says: Batch Claims with a sub-heading Generate/ Batch Claims
- Under Parameters in the blue row line go to DOS( Date of Service) From and To Dates: and choose the date, or date range for the batch of claims you want to generate.
- Then click Generate Batches.
- It will then say: “Claim Generation Successfully Completed” and will say the number of batches generated.
- Then click the Submit Claims button.
- This will bring up the list of Batch Claims and you are now in the second Tab, Batch Summary this should be highlighted in green.
- Now you will see two sets of Category Names: EDI Claims and Paper-NEW Claims
- Under EDI Claims is where you can submit the claims to your clearinghouse by downloading or by clicking the Send Action button.
- Under Paper-NEW Claims is where you can check to select the paper claims you want to print then click either CMS 1500, HCFA 1500, or Print Image then click Print.
(Side Note: If you are Printing CMS 1500 then put in the “Red Form” in the printer and print to this PDF., if you are Printing HCFA 1500 then just click print and the form will print on the paper.)
*7A. How to Reprint/Re-bill Claims:
- If you are not already at the Submit Claims screen page, then On the Main List, Click Charges, click Submit Claims then click the Third Tab called Print/Re-Bill Tab.
- Under the Claim Batch Type drop down menu select Paper
- Under the Claim Status drop down menu select Submitted
- Then fill in the Claim Date From box and the Claim Date To box
- Type in last name if needed in the name box
- Then Click Search and your Paper claim will re-appear in order to Select and Re-print.
[ AND ]
To Void a Single Charge:
- Go to Charges, then Edit Charges, Charge Master window page will appear.
- Under Patient, type in patient’s last name this will prompt a drop down list in blue with patient’s name and information.
- Mouse over the blue line and click.
- This will bring up the patient’s charges to edit.
- Under the Subheading Encounters, you will see the Medical Record # Last and First Name of patient and DOB.
- Click on the paper icon with the pencil of the claim you want to edit, this will bring up the charge to edit.
- On the CPT Box Line in Blue to the far right click the drop down arrow under Status and click on VOID should be the third to last option then click Save.
- After you click Save, a command will appear saying: “Encounter Detail Successfully Updated”
- Voiding the claim will take it off the reporting and changing the status to void will not allow it to be put back to an active status.
To Void a Batch of Charges:
- On Left side of list pane click Charges, then Submit Claims.
- Then you will see the first Tab highlighted in green that says: Batch Claims with a sub-heading Generate/ Batch Claims
- Under Parameters in the blue row line go to DOS( Date of Service) From and To Dates: and choose the date, or date range for the batch of claims you want to generate.
- Then click Generate Batches.
- It will then say: “Claim Generation Successfully Completed” and will say the number of batches generated.
- Then click the Submit Claims button.
- This will bring up the list of Batch Claims and you are now in the second Tab, Batch Summary this should be highlighted in green.
- Now in the Batch Summary Tab to the far right under Claim Details click the white dialogue icon picture.
- This will bring up the EDI Batch Log Tab where you can view the details of the claims that is in that entire batch you wanted to Void.
- Now to the far Top Right you will see the: Mark As Void box, click to check this box and you will be prompt by a dialogue box that says Are You Sure, Okay or Cancel.
- Then click Okay and you will see all the claims for that batch has been removed.
- This Voided batch is no longer in the Summary Batch of claims.
8. How to enter a payment for a selected patient?
- lick on “Patients” button
- On the “Patient Search” window you can search for a patient using “Firstname, LastName, DOB etc.”
- Select the desired patients from the list that appears.
- Now on the new window click on the “Enter Payment” button
- Fill in all the required details on the new window that pops-up.
- Click on the save button.
9. How to create an insurance payment and post the payment?
- First create a payment entry for the check amount that was received from the Insurance.
- To do this go to Payments on the main menu and click on Enter/Edit Payments click on the “Add payment Entry” button on the top right hand side.
- Once all the required info is entered, click on save and apply which will take you to the payment posting screen.
- On the payment posting screen, you would see two sections. The top section shows the payment# details which we entered.
- On the bottom section, where it says search encounter lines, enter the patient name in the search box
- You would then see the encounter line which are ready for the payment posting
- Once you see the encounter lines, enter the allowed amount, paid amount, the enter adjustment if any, select an appropriate line status on the drop down menu and click on Post.
10. How can we view a detailed Aging report for a selected patient?
- Click on the “Report Central” button.
- Then Report Central subheading button again.
- Under the heading Aging, click on Detailed- Patient Aging Report.
- The “Detailed – Patient Aging Report” will be displayed… This window gives a snapshot of the details of the Last Claim and also the Total Amounts i.e. Billed, Paid by Patient, Paid by insurance, Adjustment, Refund etc. A detailed view of the patient aging is also provided.